

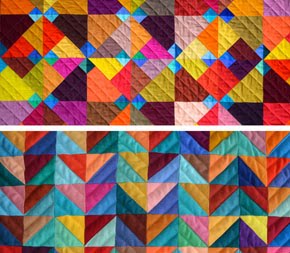
Here's a fun technique to make holes in a quilt to reveal another layer beneath.
Voici une technique amusante pour faire des trous dans un patch et révéler une couche inférieure.


I made two similar layers, and I'll show you how to proceed.
J'ai fait deux couches similaires et je vais vous montrer comment procéder.

Find a satisfying gradient of colors and make a striped fabric.
Trouvez un dégradé satisfaisant et réalisez un patchwork de bandes.

Make two of them
En faire deux pareils.

On top of one of the layer, sew a square of fabric.
Sur une des couches, coudre un carré de tissu.

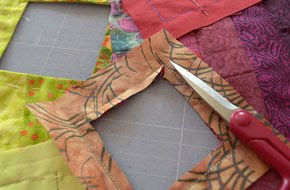
Cut all layers and cut out the center of the square, leaving a margin about half a centimeter wide around the square.
Couper toutes les épaisseurs et enlever le centre, laissant environ un demi centimètre de marge autour du carré.

Cut the seam allowance all the way to the corner. Be exact, but don't cut too far!
Coupez la marge de couture jusque dans le coin. Soyez exact, mais ne coupez pas trop loin!

Turn the left over fabric upside down through the hole.
Retournez le tissu restant et passez le au travers du trou.

Carefully press, and baste or hand stitch. Cut some excess fabric around the square, leaving about 1 or 1,5 centimeter.
Repassez soigneusement, et faufilez ou cousez à la main. Coupez l'excédent de tissu pour ne garder que 1 ou 1,5 centimètre.

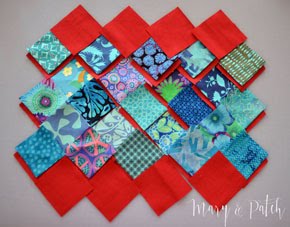
Start again, sewing more squares on the right side.
I quilted the bottom layer and laid the one with holes on top, just holding them together with the binding.
Recommencez en cousant d'autres carrés sur le bon côté.
J'ai quilté la couche inférieure, et j'ai posé celle avec des trous dessus, ne les tenant ensemble que par le biais extérieur.


I think your "Holes" is formidable. Well done! See-throughs seem to be one of your favorites. Thank you so much for sharing the process, this is very kind of you. Your quilt guild seems to be a very inspiring group (I also liked the seminole quilt a lot) and I so wish I would know of such a group in my closer area.
RépondreSupprimerthe holes looks great, thank you for explaining how you did them - this technique seems very useful to me - definitly adding to my 'things to try' list !
RépondreSupprimerI love the finished result! Linda
RépondreSupprimeryour wholes are great - same way I make my Zipper wholes :)
RépondreSupprimerI love this! The finished quilt is lovely. And thanks for showing your process!
RépondreSupprimerWow--what a great quilt, and a wonderful technique as well. Thanks for sharing!
RépondreSupprimerWow that opens up a whole world of possibilities. I'm bookmarking this one - thanks for showing us how you made them!
RépondreSupprimerMagnifique et toute votre expo de club est belle, on a beaucoup aimé malgré une pluie....
RépondreSupprimerBeautiful work, I admire your creativity! Thanks for sharing your process.
RépondreSupprimerThis came out amazing. Great work!
RépondreSupprimerSehr schön, danke fürs zeigen.
RépondreSupprimerThis is beautiful and I was wondering how you did this sort of thing, so thanks for sharing! I must try it!
RépondreSupprimerFabulous quilt! I love the technique - it's unusual and very effective. Thanks so much for sharing your process - it's given me some ideas.
RépondreSupprimerThat is really awesome! Well done!
RépondreSupprimerJe suis toujours admirative et ressens toujours une grande émotion devant vos quilts colorés et votre manière de composer. Les techniques sont remarquables. Merci de nous donner la possibilité d'apprendre de nouvelles techniques d'assemblages de tissus. Pur le plaisir des yeux et essayer d'appliquer!
RépondreSupprimerBon week-end
Nicole
Merci Nicole!
RépondreSupprimerVery interesting technique! Thanks for sharing a how to. Beautiful colors in yours.
RépondreSupprimerlovely quilt, original and fresh..with a twist
RépondreSupprimerOh my goodness! I can't wait to try this. This is the coolest thing I have seen!
RépondreSupprimerThanks Robin for your visit and your enthusiasm!
RépondreSupprimerVery clever idea Mary.
RépondreSupprimer